Showing posts with label dry erase. Show all posts

Monday, June 25, 2012

monday made it: dry erase calendar


Hi guys! It's Monday Made It!! I'm linking up with Tara at 4th Grade Frolics for her Monday Made It linky series for her 4th week of the party (my 2nd week)!

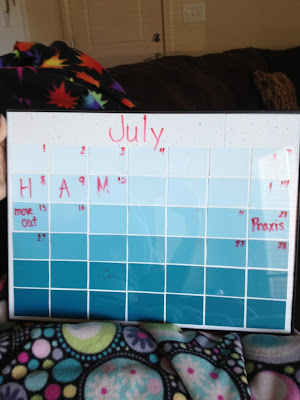
I decided to get creative today and make something with inspiration from Pinterest! I got the idea from here. I made the same thing, but mine is an ombre style dry-erase board with cool blues! I also have this "dirty" looking background to add some texture to the frame.


MATERIALS NEEDED:
16" x 20" frame - I tend to get all my frames from Michaels!
14 total paint chips (I got mine from Lowes - the Olympic kind - I chose to do mine in the ombre style but you can do yours however you want!)
2 pieces of scrapbook paper - 12" x 12"
Scissors
Ruler
Pen
Gluestick
Dry Erase Marker


STEP 1: Here's how I started the project. I began laying out the cards after I cut them to the size I wanted. Sizes will vary for your own projects, but I used about a 2 1/4 inch across and the length was made up by the cards themselves. I cut off the middle lines separating the colors on the paint chips to make them pop rather than have this white edge on them. Continue cutting and laying down until you've got it to where you want it.


STEP 2: Once you've laid it out to your satisfaction, begin gluing each square on. This was a length process, and I tend to want EVEYRTHING as even as possible.. which is not the best idea when you're doing this project. It's a lot harder than it looks!


STEP 3: Place it back in the frame and lay the glass back in. I bought the frames where they are front loading because I've used these a few times and I really like them. They're just as easy as backloading frames... just whichever you prefer!


STEP 4: You're finished! Write out whatever month you'd like - I chose to show you an example with July as that's the next month (oh my gosh... already?). I can't find my black dry erase marker so I used red. It doesn't look terrible... but this is just an example! ( YES! I'm going to the Bahamas in 12 days... but who's counting? :] )


I just wanted to include this next photo to show you how easily the marker wipes off. That was erased with one swipe of a paper towel... pretty simple!


Welp, that's all I've got for ya! Make sure to go check out all the great Monday Made Its at Tara's blog! You'll definitely be inspired :]

It's back to homework for me! Going to be a rough 12 days until vacation...

EDIT: Giveaway over at Herding Kats in Kindergarten!! She created one reaaaaally cute clipboard for Tara's Monday Made It linky party, and is now giving that along with other goodies away! Go and visit her :]

EDIT 2: Another giveaway! This time, it's at Tonya's Treats for Teachers! She's hit 200 followers. Make sure to stop on by and leave her some love - she's got some great prizes for whoever wins :]


EDIT 3: There'a another giveaway going on! It was Amber's birthday on the 25th at Adventures of a Third Grade Teacher, so make sure to wish her a happy belated birthday and enter her giveaway!

Have a good night, y'all!


PS. I've also linked this craft up at Miss Nelson's blog, Run! Miss Nelson's Got the Camera. Stop on by and check out all the other posts that have been made, and enter yourself in order to win a $50.00 Erin Condren gift certificate to shop!


Monday, June 18, 2012

MANIAC monday


OH MY GOSH. Today has been nuts! First, I started volunteering today. I have two students, one who is going into 4th grade and one who is going into 5th grade. I have to volunteer somewhere for 25 hours as part of a field experience for a class, and chose to do it with the group Boys Hope Girls Hope. My kids have good personalities, but behavior is another topic... I guess it's good that I am getting exposed to this early, though!

My summer classes also started today. BOY am I in for a rough few months. My one class is supposed to be 7 weeks long, but the professor knocked it down to a 3 week course. This means that instead of having 7 long weeks to complete assignments, I have less than HALF the time. It's a ton, ton, TON of busy work, but that's alright. We'll make it through! Although there's a lot of stuff I'm required to do, I'm going to make the best of it!

Next, I put these flea/tick preventative drops on the baby today. That was definitely not fun. Socks has such long legs and a body and neck and everything else that he ended up being able to lick the drops. This is not a good thing... he kept drooling at the mouth and throwing slobber all over the place like a dog. I called Momma and she told me to wipe it off. So, I did. Well he's still licking himself and whenever he does lick himself, he jumps like something is attacking him. I've got to admit, it's pretty funny to watch, but sad at the same time because there's nothing much that I can do. He's been sleeping most of the time since then, which is good, but the poor baby. PS. As I'm typing this, he just slobbered all over the computer... yum. Let's hope he feels better by tomorrow!

Anyways.. today is Make It Monday for my SUPER SUMMER SCHEDULE!!! I was inspired by a pin on Pinterest. I'm not sure of the original source, but I'm linking the pin I found here. If this is not one of the cutest things you've ever seen.. I'm not sure who you are! :] I made this as a future "to-do-list-reminder-list-notes-list" type of thing. Below, I'm going to walk you through the simple process of making this frame!

I'm also double dipping and linking up with Tara at 4th Grade Frolics for her Monday Made It linky party! Go check it out and get inspired :]


MATERIALS:
8x10 frame
12x12 scrapbook paper (I chose notebook paper styled paper)
Scissors
Pen
Flower sticker
Stickers (optional)

STEP 1: This first picture is of the supplies. This is the starting step, obviously, or else you wouldn't have a project to make!


STEP 2: The next step is to remove the glass from your frame. You then need to trace the glass onto your scrapbook paper. Again, I flipped it over so that way you couldn't see the line on the front of the paper if you miss it while attempting to cut on the lines (which I do often).


STEP 3: Add your flower or embellishment or whatever you want to add! I'm really into this flower (it's on my U frame, too!) so I decided to add it here. I do like the ribbon in the example one above, but I like this flower better for my simplicity.


STEP 4: You are finished! Below is an example of writing. Excuse the messy handwriting.. the dry erase marker was a large one and I usually write in cursive and well, it's hard to write with the large markers versus the small markers. Anyway, this was just an example to show you it can be written on.


This picture below shows how EASY it is to erase! I actually erased that writing with my fingers.. not wet or anything. It left no smudges or any pieces behind, so I'm really happy!


Here's my to-do list for tomorrow! I'm not looking forward to #1 and #2, but #3 and #4 I could do all the time!


Go see Moe's freaking GORGEOUS clock she made for Monday Make It as we're doing the SUPER SUMMER SCHEDULE together! I am SO jealous of how cute it turned out.

Finally, I was a guest blogger today over at Wolfelicious, which belongs to the amazing April! Go check it out and give her a follow. I promise you will not regret it.

Have a good night, y'all!


EDIT: PS. There's another great giveaway going on at Beg Borrow Steal! She's just hit 1,000 followers and is holding a great giveaway. Make sure you stop on by and enter for yourself!

EDIT 2: There's another giveaway!! Head on over to The Sweet Life of Third Grade and enter yourself into the giveaway! She's got 500+ followers and that's why she's doing this! But, you have TONS of chances to enter, so good luck to you!


Related Posts Plugin for WordPress, Blogger...